Christmas Baking hit list

DSC_0844

For quite some time, I hated Christmas. Like really hated it. It coincided with the fact that I worked in a toy store and had to endure hours and hours and hours of Christmas holiday angry mothers trying to find that one essential toy that their little cherub demanded for Christmas. The after effects were also made worse by the fact that I worked on the refund desk and was subjected to abuse from said mothers who were now post Christmas angry mothers whos children’s toys did not work for many reasons. Apparently it was all my fault.


So it was much to my surprise after quitting the ol’ toy store that I found my Christmas spirit return. Little sister and I used to always Christmas bake and sometimes those baking products would make it to Christmas. We no, I’m lying actually. They never lasted. But it was always a fun and delicious experience.


Now a few years back I was lucky enough to gain a sister-in-law who loves to Christmas bake as much as I do and we now make it an annual activity. We get together, put on very bad Christmas carols and bake the day away. Last year we even enlisted mother-in-law to come along. The lovely dear thought she was coming to join in on the baking. Much to her surprise, the job given to her was to keep the girls entertained and out of our hair. He hheeeeeee.


So while I will be very pushed for time this year (with new job training and all) I am hoping to lock down a date with sister-in-law to get our bake on. I am very excited this year because Miss 4 is actually old enough to help out and to be trusted to not eat too much of the baking supplies before they are baked. Here are my pinterest finds for this year….


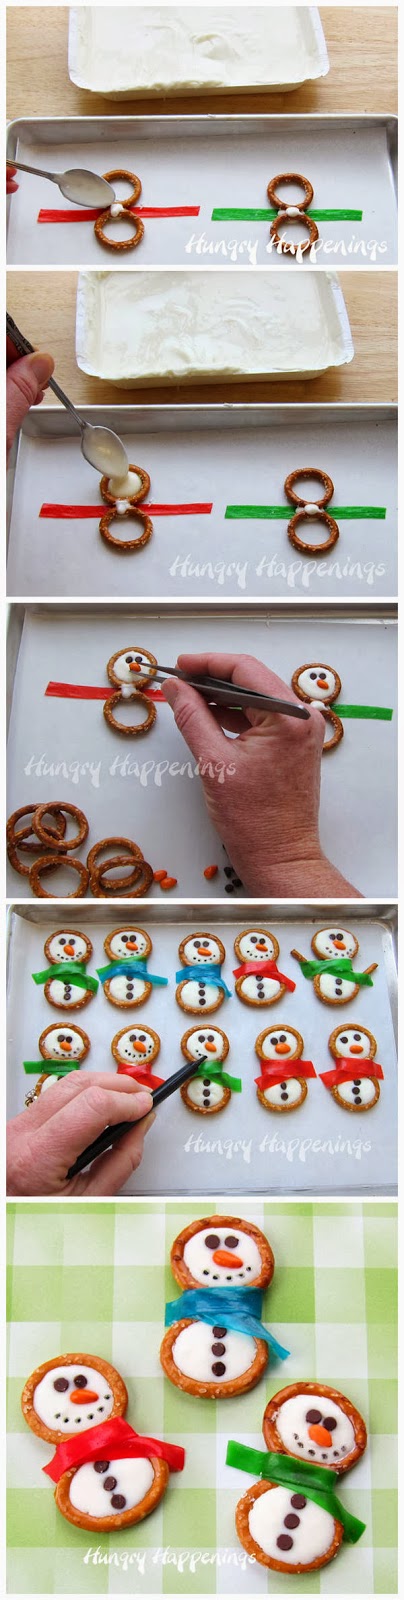
These cute little snowmen caught my eye! The girls will LOVE them. I really don’t need to say much more because they are just so cwute!


IMG_1737

Candy cane biscuits. On their blog, the We are not marthas call them Sparkling Peppermint Sugar Cookies, and of course they would being American, it makes sense to the. I on the other hand, will be calling them Candy cane biscuits so that Miss 4 knows what the hell I’m on about!


balls

ON pinterest the description for these just said “balls”. That was enough to catch my eye (ooohhh balls!!) and being the immature mother that I am, of course I lol-led. They are Peanut Butter balland they have my mouth watering already. Sure, innuendo intended.


Red Velvet Snowflake Cookies @createdbydiane

Red velvet snowflake biscuits. They look just beautiful. And I sneakily acquired a snow flake cutter (by way of sneaking yet another home magazine into my food shopping without husband knowing) so they will be perfecto!


Sheena 3.jpg

Have you ever eaten a chocolate coated pretzel? Errmaggheerrddd they are so freaking good. And when you find a recipe for Chocolate Coated Pretzel Rods  (hhaaahhaaa am I the only deviate laughing at this too?) you really can’t go wrong, can you ladies?? 😉 😉 You’re terrrrible Murrriel. yes I am, and delirious with Christmas spirit too.


So here’s hoping I get to make them all, and that I don’t eat them all in the first week after making. Being a heifer for Christmas was not really on my plans.


What are you baking for Christmas??


Happy baking,


The Dietitian Mummy.

It’s getting hot in hurrrr, so mar-i-nade your meat

Yeah that’s right, I’m a gangsta. Well obviously not really, but I can pretend right?


Basil and garlic chicken

Basil and garlic chicken

Over here in Radelaide the sun is starting to shine and the weather is getting amazing! It’s funny how much the weather determines the foods that I cook. Sometimes I will have a comfort-food type recipe planned for a dinner and then that day turns out to be warm and I just can’t bring myself to cook a hot meal on a hot day. When the weather is warm, we turn to salads.


Marinade madness

Marinade madness

Salads for me though are so much more than just leaves and chopped up tomato plonked on the side of the plate. I LOVE to make a meal out of it, adding in meat or eggs, carbs in some form, seeds, nuts, cheese, whatever takes my fancy on the day actually. There is one thing that really makes  a salad. And that is a good meat marinade.


Lamb greek salad kids version

Lamb greek salad kids version

A good marinade means that every bite you have with the meat in it, is just one of those mouthfuls that you just can’t help but groan out loud. I have two go-to marinades that always come out of the woodwork when the weather warms up: garlic and basil chicken; and greek lamb.


These marinades are the sorts of things that busy girls can do in the morning before work or mum life and then throw together into an amazing salad at the end of the day.

IMG_0974

So here they are, do your taste buds a favour and get into these.


Garlic and basil chicken:

This will be enough for 2 chicken breasts or 4 chicken thighs.

Finely dice 2 cloves of garlic (or use 2 tsp minced garlic from a jar) and put into a bowl with a big handful of basil chopped finely, a squeeze of half a lemon, a pinch of sea salt flakes and a good glug of olive oil. Plonk your meat in and get in there with your hands and give the meat a good massage with the marinade. Leave this for at least half an hour but for as long as you have.

When I use this marinade I normally brown the chicken well on all sides then finish it off in a 190 degree oven.


Greek Lamb:

This is enough for about 500g lamb pieces.

Finely dice 2 cloves of garlic (or 2 tsp minced garlic), put in a bowl along with 1 lemon squeezed, a big pinch sea salt flakes, some cracked pepper, and 2 tsp oregano (fresh if you have it). Repeat as with the chicken marinade.

For the lamb pieces I will just fry them in a frypan with some olive oil.


Add to your salad or on a plate with some salad and voila, summer meat madness.

Happy cooking,


The Dietitian Mummy


Home-made pizza adventures

SONY DSC

Roasted veg and feta

I think you all know by now that I’m into less processed foods. And I’m also SUPER keen on encouraging y’all to cook more from home. Add into that my obsession with dough and you have a recipe for dinner success, home made pizza success that is.


I love dough. I really do. So do my girls. We love putting the yeast in the luke warm water and watching it froth. Miss almost-4 says that it’s like fireworks if you watch it from the top. We love sifting the flour in and mixing with our hands. They LOVE getting a chance to knead the dough and then check on it as it gets bigger and bigger and BIGGER. It really is a wonderful lesson for them to learn.


My great love, dough

My great love, dough

When it is pizza dough we are making they get extra excitement because it also means that mum will let them “help” roll out the dough. They get to watch mum throw a pizza base in the air (purely for entertainment guys, not necessary) and they also get to sprinkle toppings. It is the most fun they have in our kitchen I tell you!


Pizza dough is also an awesome time saver because it freezes really well. I will often make a big batch, portion it up and freeze it for the nights that I really can’t be bothered making something elaborate. At one point I was also bagging and freezing chopped up pizza toppings so all I had to do was roll out the dough, dress the pizza and cook.


Margherita heaven

Margherita heaven

No-one ever believes me but it is seriously simple to make your own pizza dough. SERIOUSLY! If I want the process to be quick I will sometimes secretly make the dough while the girls are otherwise entertained J. I’m okay as long as they don’t hear my pyrex bowl clink on the bench. If they do, they know that some cooking is going down and my clean kitchen is a goner!


The other awesome part about pizza is that you can cater for everyone’s tastes. There an almost endless list of options for pizza toppings and you can go wild with your combos! I have been known to hold pizza nights where everyone comes and brings their favourite combos. You get to share your favourite but also learn new toppings to add to the repertoire.


Rising to heaven

Rising to heaven

If you want to take it to the next level, make your own pizza sauce too. It is super easy as well and you can freeze it along with your dough for many happy pizza nights to come.


Get your prep on

Get your prep on

I use taste.com.au for my pizza dough recipe. The link is here.

So here are our favourite pizza topping combos:

Simple starters

  • Margherita: pizza sauce, sliced tomato rounds, cheese and sprinkled Italian herbs.
  • Ham and cheese: the girls almost always just choose ham and cheese for their pizza. In saying that, they will end up stealing bits of our pizza with other toppings on it too.

–          The lot – basically anything and everything you can find in the fridge


Mexicano

Mexicano

Gourmet explorations:

  • Tandoori chicken: marinate some chicken breast in tandoori paste and cook in a frypan before putting on pizza. On top of pizza sauce layer the chicken, green capsicum, cheese, mango chutney and sour cream. After it is cooked top with some fresh coriander.
  • Roast veg: pizza sauce, layer on roasted veg like pumpkin, zucchini, eggplant, capsicum, carrots and beetroot. Slices rather than chunks work best. Top with crumbled Danish feta and pine nuts.
  • Mexican – slow cooked salsa chicken, capsicum, sour cream, cheese.
  • Potato and bacon – sliced potato, diced bacon, drizzled sweet chilli sauce, sour cream blobs, and cheese
  • My sisters Brussel sprout, leek, and goats cheese! She sautes the brussels and leeks with some bacon and then tops the pizza with it, crumbling the goats cheese on to finish!
Keeping it basic, ham and cheese

Keeping it basic, ham and cheese

So get your Italian mumma on and get kneading some dough. It’s therapy and dinner at the same time!


Happy cooking,


The Dietitian Mummy

Beetroot tzadziki and spinach and pine nut dip

image

Does anyone else have surplus veggies at the moment? I do. Beetroot and spinach to be exact.
 

image

image

Funny story about my beetroot. I hadn’t grown it successfully before and my sister had. I planted them out and as beetroot does, I got 3 seedlings from each seed. I asked big sister if she thinned hers out to which she replied “no I never bother and it’s always fine”. Fast forward 2 months later and my beetroot patch is going mental. Big sister came round and saw it, laughing she said “yes, you probably should have thinned it”. The result is fine, I just have a very random assortment of sizes in my beetroot. Perfectly fine for my purposes because sometimes I want some little quickies to cook up for a salad and other times I want some big mummas to roast. My main reason for growing beetroot though is one of my recipes today. Beetroot tzadziki mmmmmm.
 

image

My spinach is also going bananas. It has been since I planted it and I find it hard to think of inventive and exciting ways to use it. My Miss 3.75 of course says “uurrgghhh yuucckkkk” if it is found on her plate, which results in the same reaction copied in Miss 1.75. While I was making another dip I had an idea to recreate a favourite bought dip of mine, spinach and pine nut.
 

image

The result was astounding, especially seems my girls don’t seem to like sauces or dips.  I served both dips on the table with our dinner and the girls were loving them. Miss 3.75 was eating the spinach dip so fast that I was worried about her getting oxygen overload once that iron hits her bloodstream and Miss 1.75 was chowing down the beetroot so much that she resembled a vampire fresh from a feeding.  Regardless of whether your kids like the dips or not, they are scrumptious for adults.

image

 
So here are the recipes…
 
Beetroot Tzadziki
Ingredients
About 4 large beetroot (or 8 beetroot of varying sizes as it happened)
300ml greek yoghurt
1tb chopped or minced garlic
1.5 tb fresh thyme leaves
1tsp caraway seeds
1 pinch sea salt flakes
Method
Steam the beetroot until you can shove a knife in there easily.
Once cool enough to touch rub the skin off the beetroot. Wash your hands straight away or deal with pink hands the next day (show your kids first though, they thought it was hilarious).
Put in a blender, stick mixer or food processor (whatever you have) and blend. Add the greek yoghurt and herbs and blend some more. Add more yoghurt or herbs to balance out the taste if needed.
 

image

Spinach and pine nut dip
Ingredients
1 big bunch of spinach, chopped roughly
3/4 cup pine nuts
1 onion diced
1 tb minced or chopped garlic
2 tsp all-purpose seasoning
200ml greek yoghurt
Method
Cook the onion in a big frypan  gently until soft.
Add the garlic and stir for a minute or so before adding the spinach. Chuck a lid on the frypan and let the spinach sweat down and cook.
While the spinach is cooking, toast the pine nuts in a frypan (no oil). Then blend in your processor/stick mixer.
Once that is done let the mixture cool before doing the next steps.
Blend the spinach mixture, then add the nuts and blend some more. Stir or blend through the greek yoghurt, about 2 tablespoons at a time. Stop when the dip gets to your desired consistency.
Do the same thing with the seasoning. Add bit by bit until you get to the taste you like.
 
Serve both with toasted pita bread and enjoy the fresh produce!!

image

 
Happy cooking,
 
The Dietitian Mummy.

Weight Loss Eating Plan


PhotoGrid_1411366647013

Okay I know I said Friday but it’s all done annnndddddd here it is early!! The Dietitian Mummy Weight Loss Eating Plan.

https://payhip.com/b/f7oR

Eating Plan Cover Final

You asked for a weight loss meal plan and here it is! I have structured it as an eating plan rather than just a meal plan. What is the difference? Well an eating plan gives you a guide of how many serves of which foods to eat each day. It then tells you what a serve is and allows you to plan and build your day of eating. You can adapt it to your week, your family and your likes. It gives you the opportunity to adapt your plan to suit dairy free, gluten free and food intolerances.


But then if that all sounds too hard, there’s also a meal plan in there! For 2 weeks at that. All planned out and ready to go.

PhotoGrid_1410950527746

It is also based on real food. No hard to pronounce foods, no searching health food stores for certain (expensive) products. Just real, honest, food.


It is an eating plan (which is accompanied by meal plans) but it is soooo much more.


In The Dietitian Mummy Eating Plan you get…

-weight loss information

-the eating plan instructions

-4 weight loss levels for women, including a breastfeeding level

-serve size guides

-recipes for breakfast, lunch and dinner

-2 weeks of meal plans

-tracking sheets and blank meal plan for planning


All this written by an Accredited Practicing Dietitian, mum, food lover and weight loser!


So follow this link and be on your way to weight loss. Once you have bought it, join us on facebook to ask questions and achieve your goals along with others along the same path!


https://payhip.com/b/f7oR


The Dietitian Mummy.

Quick Red fish curry

image

I was never a fish lover. I was a fish hater. I blame my mother, the great fisher woman, and her ability to catch multitudes of fish whenever she threw in a line. I tell you, fish quake in their fins at the sound of her cast, she’s pretty good. Needless to say, our childhood featured a LOT of fish. Especially because money was tight, and fish were free. So after being forced to eat fish about a thousand times, I decided to boycott. And did so for a good 15 years. It’s only just now that I’ve regained my taste for the ol’ fishy.


Today’s recipe is a quicky. A red fish curry quicky. I whipped this number up mid week for me and husband and it was delish. Hot and spicy, but light and not leaving you feeling stodgy after. It’s super low fat and full of goodness all round so get on it.


Red Fish Curry with basmati rice

2 x 125g fillets white fish, diced into chunks

2 tbs thai red curry paste

1 onion, diced

½ zucchini, diced

1 sweet potato, diced

3 sticks celery, sliced

Handful beans chopped

2 cups chicken stock

1/2 375ml Carnation light and creamy coconut (evaporated milk)

Corriander

Rice to serve

1 tbs olive oil

Method

Fry the onion on medium heat in a saucepan until tender. Add in the rest of the vegetables and cook for about 5 minutes. Add the chicken stock along with the red curry paste. Simmer for about 20 minutes until the sweet potato is cooked through. Add the light and creamy and simmer for a further 10 minutes. In the last 5 minutes add in the fish.

Before serving, check that the fish is cooked. Serve with rice and a sprinkle of fresh coriander on top.

Super sesame salad dressing

image


Say that 10 times fast??!!


We have been hit with some gorgeous weather here in good ol’ Radelaide this past week which has instantly had me craving salads. Now don’t let me lose you straight away, salads to me are not your rabbit food-like situation. I like my salads to be full of all sorts of goodies like beans, nuts, seeds, as well as your usuals of lettuce, carrot, cucumber and always finished off with some sort of cheese (lately I’ve been

slamming the Danish feta). Essential tastes and textures to me for a salad are things like freshness, crunch, tang, a bit of saltyness, something smooth, bursts of random flavour and of course (which brings me to the reason for today’s post), an awesome dressing.

image

There is a café around my parts, that has an awesome salad dressing. For years I have tried to replicate it. It’s kinda sweet, but tangy, with a hit of nutty-ness but not thick, and just a tad of oil. A friend of mine worked at that café and while she didn’t give me the actual recipe, she did let me in on the key ingredient for it’s particular taste. Tahini. Now I made this dressing for a while with unhulled tahini and it just didn’t taste right. It had a weird flavour to it. Until today. After reading some old blog posts from a favourite (Apples Under My Bed) I realised that the after taste was probably because I had been buying unhulled tahini. I made the swap to hulled tahini and wow, it made the difference. Today must have been a great day because I nailed the dressing. Apologies for my vague quantities in my recipe, but that’s the way I cook.


So here it is. Super sesame salad dressing.

Ingredients

2 spoons hulled tahini

2 spoons honey

4 spoons boiling water

1 squirt lemon juice

1 spoon vinegar

1 spoon oil

Pinch sea salt flakes

Use any sized spoon depending on how much you need.

Put the honey and boiling water in a jar. Shake until the honey is dissolved.

Put in the rest of the ingredients and shake until it’s all combined.

Pour over salad!

Chicken Stock

wpid-20140714_115444.jpg

I talked a few weeks back about cutting up your own chickens and how you are left with a whole lot of wastage and making your own chicken stock is a really good way to utilise some waste. My main motivation for making my own chicken stock is mainly for taste but also because Miss 3 seems to go agro on commercial chicken stock. There are a fair few preservatives in it and the yeast extract that is in most of even the liquid forms is what I suspect makes her go bananas.

The pot simmering away

The pot simmering away

Making your own chicken stock sounds ultra super-mum-ish which I hate, but it is actually SUPER easy. And it makes your house smell yummo too. It’s smoother in your meals, especially the ones that you make an effort to take a long time to make like risotto. Seriously you can taste the difference.


And do you know the best part? Most of the ingredients are parts of foods that you rarely eat! The left over chicken bones, the tops of celery and leek. It saves you money and stops wastage too. I can’t bang on about it enough.

But anyway, I’m blabbering on because the “recipe” is so easy it wont take long to write!


No that's not my scraps, that's my flavour

No that’s not my scraps, that’s my flavour

Chicken Stock

1 Chicken carcass. You can use an already cooked one but you will have to give it a good ol’ beating, will have to cook it for longer and the stock wont be as tasty. Raw is best.

Half of a top of celery (the leaves and thin stalky bits)

1 carrot

1 onion

The top half of a leek

Garlic cloves

Herbs – I generally use 2 bay leaves, and 2 sticks of rosemary

Peppercorns – about 6

Good lug of olive oil

Method

1. Put a lug of oil in the pot and brown the carcass.

2. This is the worst part: get a rolling pin and bash the chicken bones with the end of it. It’s a bit queasy for me hearing the bones crack (probably PTSD from a broken clavicle on entry to this world) but this is especially essential if you are using a cooked chook.

3. Chuck everything else in along with about 2 litres of water.

4. Bring to boil then simmer for the day.

5. I don’t usually add salt to the stock because I add salt when I cook so it doesn’t taste anything like commercial stock at this point. If you prefer to start with your stock salty then add salt while it’s cooking. Add it bit by bit and taste after a few minutes before adding more.

6. Strain the liquid out and there is your stock. If you want the fat out of it then put the liquid in a bowl in the fridge and use a spoon to scoop off the fat layer the next day.

The "leftovers"

The “leftovers”

7. Freeze in portions that you would normally use.

Easy peasy!!

Seriously have a go, your cooking will improve ten fold and it’s less useless preservatives entering your kiddies little bodies.


Happy cooking,


The Dietitian Mummy

Granola heaven

Granola heaven

Granola heaven

For ages I have been thinking about making granola. I’ve eaten it around the place before at café’s or my mums (mum LOVES granola). I’ve read about making it here and here. I’ve watched big sister make it before, but never have I gotten around to making it. Well, I can tell you right now, that is going to change from now on because on the weekend I had my first foray into granola making. It is safe to say that I, along with husband and the two girls, are all now granola mad.


The line up...

The line up…

After searching a few different recipes, I decided on a mixture of a few, but it is mostly like the link above along with some of my own additions. The making was definitely easier than I had previously thought. The girls, as usual, came clamouring into the kitchen the second they heard my pyrex mixing bowl clang onto the bench top. There they stayed, with Miss 3.5 asking every 5 seconds what part was her job. It’s a great kids cooking recipe because the mixing is fairly easy and you could even let the kiddies get their hands in there to mix too (if you can stop them from eating it that is).


Love me some nuts

Love me some nuts

The absolute best part was the smell. Oh my lordy the smell was amazing. It filled the whole house with a sweet delicious smell. I can still smell it on the scarf I wore that day mmmmmmmm. Husband returned from a surf and was practically dribbling at the oven door to see what it was. We ate it hot, scraping spoonfuls from the tray because we just couldn’t help ourselves. Chewy, hot sweet mouthfuls with the crunch of yummy hot nuts too. We also ate it cold once it was crunchy, over the top of each of our yoghurts. We eat it from the jar in the pantry. We take it to work as a snack. Miss 3.5 stands in the pantry looking at it and asking for the yummy crunchy stuff. We are sold.


The helpers

The helpers

I swear, mumsy smelt it from her house or something because just as I had finished cooking it, she magically turned up on the doorstep. I put some in a container for her and by the time she had a cuppa and went to leave, the majority of it was gone 🙂


Pre-bake

Pre-bake

So here’s how to make some of this crunchy, sweet delicious goodness….


Granola

Ingredients

3 cups oats

1 cup bran sticks

2 tablespoons canola oil

½ cup pure maple syrup

Squirt of honey

1 tablespoon brown sugar

About 1 ½ cups nuts (cashews and almonds in my case)

1 ½ cups cranberries

1 cup chopped dates

¼ cup chia seeds


Preheat your oven to about 150 degrees.

Mix together the oats, bran sticks, chia seeds, and nuts.

Mix together the wet ingredients and the sugar, then add to the dry ingredients.

Stir until all mixed together then spread out on a baking tray.

Bake in the oven for about 20 minutes, occasionally stirring around the mixture.

Add in the dried fruit for the last 5-10 minutes, watch closely to make sure it doesn’t burn.

Done!! Eat!!!

Low kJ Chicken Tonight

wpid-20140805_172222.jpg

My darling mother was not the most adventurous of cooks. She was an extremely competent cook and would give us variety enough, but I think when the concept of convenience cooking came onto the market she was spent and so we saw a lot more of those options hit the table. Now just to clarify, because she will be mortified if I don’t, there was always an abundance of vegetables and the meals were definitely more on the healthy side, when I say convenience I mean premade sauces and spice mixes.  Dad says the mum doesn’t make meals she assembles them 😉 (ouch yes).


One of my FAVEs growing up was Chicken Tonight French Country premade sauce. I would finish mine and any that was left on little or big sisters plates as well as anything left in the pot. I was insane for it.


I feel like chicken tonight, like chicken tonight like chicken tonight….


Little sister in a bout of clean eating a while ago came up with a recipe she told me tasted exactly like good ol’ chicken tonight so I re-created it and ever since have slotted it into the meal plan whenever I can. Here is the recipe for all of you following along at home!


Low kj chicken tonight

Serves 4

400g chicken breast, sliced

2 carrots sliced into sticks

2 mushrooms sliced

2 sticks celery sliced

2 cups chicken stock (home made if you can)

½ cup dry white wine

½ cup light sour cream

1 ½ tablespoons corn flour

Rice to serve.

Method

Use a large fry pan with high sides or a saucepan.

Brown your chicken with some oil and set aside.

Brown the onion until tender and then add the other veggies. Cook for a few minutes.

Add the wine and let it bubble for a while before adding the chicken stock and the chicken.

Turn down the heat to a simmer and give it a good simmer for about 20 minutes until your veggies are the consistency you like.

Mix the corn flour into the sour cream, make sure you get rid of any lumps.

Take your pan off the heat and dump your sour cream mixture into the middle. Stir it in gently using small circles, moving out to bigger as it becomes more mixed in. I find this helps to stop it from getting grainy.

Put the pan back on the heat and simmer until it is the sauce thickness you want. The longer you simmer it, the thicker it should get. If you want it thicker, use more corn flour J


Are you having chicken tonight tomorrow???


The Dietitian Mummy.